Wednesday, March 6, 2013

Crackers - Daring Bakers February 2013


 Being an avid reader of food blogs long before I decided to get my own, I would often come across posts labelled as a "Daring Bakers (or Cooks) Challenge."  It was only months later that I decided to look further into the matter (gosh, I'm making it sound like something so much more serious than just a community of food bloggers, aren't I?) and I discovered what it was all about; essentially, the Daring Kitchen is an online community where recipes and advice is discussed and shared by bloggers, budding chefs and fatties alike (guess which one I fit into). The Daring Kitchen Challenges come in two types; the Daring Bakers and the Daring Cooks, who would each month take on a new "challenge" and cook something new, different and sometimes, just plain weird (just wait 'til the next challenge post....).
Each month on the 27th, everyone involved posts and shares their products and everyone joins together in a collective screen-licking. Or something.
Yes, it's past the 27th but I found me some fine print, dictating that there is a one week "grace period" to post so it's all good :). Yes, I'm just making excuses for my procrastination again. Shut up.

SO NOW onto the actual challenge. 
This month's challenge was very generous and not too difficult, allowing free reign on the choice of recipes and involving nothing too difficult. The challenge was to create any sort of cracker/crisp flatbread, so long as it was crunchy (so no like...un-crisp flatbread). I made two types of crackers, one using olive oil as the binding agent, the other using butter. The second one was definitely preferred, although next time I'll be sure to add more pepper and perhaps some dried herbs or something, it was a bit too plain with just the cheese. The dough was a little tricky to work with due to all the cheese and butter, but it was nothing too difficult. 
On the other end of the seasonings spectrum, the olive oil crackers were waaay over-seasoned and were definitely too salty for my liking (although my sister loved them). A shame, since I quite liked the crispy texture of these. Perhaps next time I'll refrain from chucking in the entire seasonings drawer into the mix (jokes, I'm Indian* and you'd actually die if that happened). 

Easy Cheese Crackers (Adapted from Nigella Lawson)
  • 100g plain flour
  • 200g grated cheddar cheese
  • 50g soft butter
  • 1/2 tsp baking powder
1.   Place all the ingredients into the food processor and process until the mixture starts to come together.
2.   Bring together into a dough using your fingers and wrap the dough in cling wrap. Allow to rest in the fridge for half an hour or until dough is firm to the touch.
3.   Preheat the oven to 200 degrees and grease two large baking trays. 
4.   Roll out the dough until it is approximately 3mm in thickness. Use a cookie cutter to form cookies and place on a greased baking tray.
5.   Bake for ten minutes or until golden brown.
6.   Allow to crisp up on the baking tray for five minutes before transferring to a wire rack to cool completely.
Olive Oil crackers with Herbs
  • 1 cup plain white flour
  • 1 tsp baking powder
  • 1/2 tsp salt
  • 1/2 tsp ground black pepper
  • 1/4 cup olive oil
  • 4 tbs water
  • 2 tbs dried herbs 
  • coarse sea salt, to sprinkle
1.   Preheat the oven to 190 degrees and grease two baking trays.
2.   Combine all the dry ingredients in a bowl.
3.   Add the olive oil and water, stirring til the mixture starts to come together as a dough. Add more water if the mixture is too dry, but keep in mind that it will be very crumbly. 
4.   Form the mixture into a dough with your fingers and roll out into a thickness of approx. 3mm.
5.   Use a cookie cutter to form cookies and place on a greased baking tray. Sprinkle each cracker with a small amount of sea salt. Be careful not to oversalt!!!!
6.   Bake for ten minutes or until golden brown.
7.   Allow to crisp up on the baking tray for five minutes before transferring to a wire rack to cool completely.


Blog checking lines: Sarah from All Our Fingers in the Pie was our February 2013 Daring Bakers’ host and she challenges us to use our creativity in making our own Crisp Flatbreads and Crackers!


Tuesday, February 12, 2013

Portugese Custard Tarts

I know, I know.
I have no excuses as to why I've been blogging so little lately. It's basically nothing to do with practical issues and everything to do with being lazy. Okay, and the fact that I don't bake as regularly anymore without hordes of guinea pigs school-friends to feed/that I've just been re-making old recipes, but......y'know.
So I bring to you, fashionably late, my first recipe post of 2013. By the way guys, happy new year! (Better late than never, no?)
* * * * 
There was a show that aired on National Geographic when my brother and I were in primary school, by the name of Chasing Time. I doubt many know of its existence, its run seemed short-lived and its Wikipedia page bare; but it was awesome. More or less, a team of two would perform a certain number of challenges based in a certain city in the world, kinda like The Amazing Race, but... different. Anyway, one episode saw a team of two travelling to Lisbon, one of the challenges (somehow, I don't think eating these was a challenge at all) requiring them to find and eat some of Portugal's culinary claims to fame; custard tarts. 
The flaky pastry, creamy custard and the caramelised, browned tops were always a point of fascination to me and I vowed to never rest again until some of these were acquainted with my mouth. 
Whelp, it's been about ten years and no one's ever bought me a ticket to Lisbon. Yet somehow, I've managed plenty of rest in this life of mine. Go figure. 

It was only at the start of this year when, with a freezer full of un-used puff pastry and a fridge stocked with eggs, I decided to recreate these for myself. Okay, so making these at home after seeing the real deal on tv was kinda like settling on McDonald's after visions of The Fat Duck, but hey, one step at a time.

The recipe I used was from Not Quite Nigella, who in turn adapted it from Bill Granger. NQN herself stated that she uses regular milk as opposed to cream when she makes these; a welcome adjustment to me as I don't usually have cream in the fridge anyway. The custard came together quite easily although i did strain it as an extra measure -- lumps just freak me out, okay. Also, I don't know how but the custard only made enough for about six tarts for me, so next time I make it, I'll definitely be making a double batch of custard. Aand I'll probably only eat them fresh from the oven; I had one when they were cold and yeah, let's just not go there. 

Portugese Custard Tarts (Adapted from Not Quite Nigella)

  • 2 egg yolks + 1 whole egg
  • 115g caster sugar
  • 2 tbs cornflour
  • 250mL milk
  • 2 tsp vanilla extract
  • 1 sheet puff pastry, thawed
  1. Preheat the oven to 200 degrees and grease a 12 hole muffin pan with some melted butter.
  2. Whisk the eggs, sugar, cornflour and milk together in a medium saucepan until smooth.
  3. Gradually whisk the mixture over medium heat until it thickens and no liquid remains in the pan.
  4. Off the heat, whisk in the vanilla extract. Cover the bowl with a loose layer of cling wrap and allow to cool.
  5. Meanwhile, cut the sheet of pastry in half and place one half on top of the other.
  6. Roll the sheets into a tight coil (from the short ends) and using a sharp knife, divide into twelve equal parts. 
  7.  Use a rolling pin to gently flatten each round until it is large enough to comfortably fit into a hole in the muffin pan.
  8. Place pastry rounds inside the muffin pan and spoon two tablespoons (or enough to fill up each case almost to the top) of custard into each pastry case.
  9. Bake for approximately 20 minutes or until the tops of the tarts have browned and the pastry is puffed and golden.
  10. Allow to cool in muffin pan for five minutes, before transferring to a wire rack to cool completely.

Wednesday, October 31, 2012

Oreo-Stuffed Chocolate Chip Cookies

I don't really know what to call these. They exist in the baking world, they're not an original idea of mine, but what on earth do you call them? My initial thought went to the movie Inception. I don't think my brain can take the amount of screwing-over this movie allegedly provides, but I've heard of the whole "dream within a dream" thing and how  "x within a x" has itself become a "thing." And that's exactly what this is! A cookie within a cookie, cookieception if you will.
These are unashamedly... shall we say, indulgent. I appreciate a more euphemistic tone over "food that will make you fat and stuff." These are living proof that it is in fact possible to make chocolate chip cookies/oreos even better than they already are, and aren't all that difficult to make.
The recipe I used was the same chocolate chip cookie dough as one featured in one of my other posts, I'll post it again anyway, though.
There isn't much else to say about these so here's the recipe!

Chocolate Chip Cookies (Adapted from spicy icecream)
  • 240g (approx two scant cups) plain flour
  • 3/4 tsp baking soda
  • 3/4 tsp baking powder
  • 1 tsp sea salt (table salt is fine)
  • 140g soft unsalted butter
  • 3/4 cup light brown sugar
  • 110g (just over half a cup) caster sugar
  • 1 large egg
  • 2 tsp vanilla essence
  • 250g milk chocolate chips
Additionally
  • One packet of oreos
  1.  In a small bowl, whisk together the flour, baking soda and baking powder.
  2. In a separate bowl, cream the butter and sugars together until light and fluffy (around 3-5 minutes) with an electric mixer on medium speed.
  3. Add in the egg, mixing until it is well incorporated.
  4. Add the vanilla and mix briefly to combine.
  5. Add half the flour mixture, mixing on low speed to combine.
  6. Repeat with remaining flour mixture.
  7. Fold in the chocolate chips with a large metal spoon.
  8. Form the mixture into a dough with your hands, ensuring the chocolate chips are well distributed throughout the dough.
  9.  Roll the dough into a large ball, wrap twice in cling wrap and place in the fridge to chill for at least twenty minutes.
  10. When ready to bake, preheat oven to 175 degrees and roll the dough out into a cylinder with your hands.
  11.  Using a sharp knife, cut off two small portions of dough; enough to encase your oreo.
  12. Sandwich the oreo in between the two pieces of dough, pushing it all together so that the oreo is completely covered and no longer visible.
  13. Repeat with remaining dough/oreos, placing them on a greased and lined baking tray with enough room for the cookies to spread.
  14. Bake in the oven for approximately fifteen minutes or until the cookies are golden brown.
  15. Cool cookies in baking tray for five minutes, before easing them off the baking paper and placing on a wire rack to cool completely.

Monday, October 8, 2012

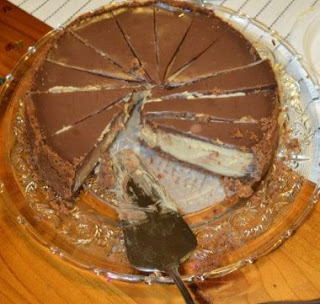
Chocolate Peanut Butter Cheesecake


Somehow, almost a whole month has passed since I last posted a recipe, which is admitedly quite a while although not something I will apologise for (although I do sort of apologise for the picture; I forgot to take one prior to cutting). The past month has yielded some of the most important events in any teenager's life, and in fact in any adult's. The last few weeks of highschool came about, with both the obligatory tears and the outpouring of sentimental emotion. The grade's Facebook page was almost unrecognisable, the usual sporadic posts about homework help and assingments replaced with long, thoughtful and heartfelt messages filled with the realisation that six years of schooling together has come to an end. It's a strange thing to finally be a high school graduate, but it's inevitable that we too would eventually be exposed to the big, wide world. While it is definitely sad to be leaving behind something which became such a large part of us (whether we liked it or not!), we must keep in mind that there is so much more ahead of each and every one of us, and that the memories we created will never be lost. Also, we have a HSC to focus on! (She says as she blogs about cake).

Graduation aside, I also had my eighteenth birthday a few weeks ago. Celebrated with a bunch of my favourite people and continuing into the night with a small yet enjoyable sleepover, the day marked my transition into adulthood. I know everybody says it, but I honestly do not feel anywhere near that old! I still remember the day my (now 20, soon to be 21) year old brother turned eighteen, and he seemed so much.... older. I'm aware that this is something said mainly by middle-aged women trying to cling onto their last shreds of youth, but you are only as old as you feel! I suppose that voting responsibilites and legal standing aside, I won't truly feel like an adult for many years (or at least until uni starts!)

Now onto the actual baking bit! (I should've put a disclaimer at the start so people could just skip to the baking bits). I baked a variety of desserts for my birthday party, including this cheesecake which I have had my eye on for quite a while. It comes from Nigella Lawson and, although I feared this wouldn't turn out well, I decided to give it a try since my attempts at her Old Fashioned Chocolate Cake yielded such wonderful results.
Using what I think of as one of the best combinations ever, this cheesecake tasted amazing even before being baked, and came out of the oven retaining the same quality. It also wasn't all that hard to make, which is always, always a plus.

My only issue was with the base. Nigella favours digestive biscuits for her cheesecake bases, which I have no problem with, but I also followed her addition of chocolate and peanuts to it. I couldn't taste the chocolate at all so it seemed redundant, and the peanuts made the base rather oily. Next time I make this, I'll definitely stick with just the biscuits. I think I might just take this opportunity to talk about how great digestives are! They sound unpleasant but the fact they are sweet but not overly so make them very enjoyable to eat, and a perfect balance for the rich and decadent cheesecake filling/topping.

Although some family members had reservations about the peanut butter and chocolate combination (I sincerely believe age has diminished their tastebuds!), this cheesecake gained positive comments, including one which I am sure is aimed as a compliment but translates as something accidentally insulting ("It was so good, I had difficulty believing you made it!). However I do think my favourite one was being asked by a friend if I'd marry him and bake him this cheesecake every day, whilst I was seated between both his girlfriend and my own boyfriend. Good times.

Chocolate Peanut Butter Cheesecake (adapted from Nigella Lawson's recipe)

For the base

  • 200g digestive biscuits
  • 50g salted peanuts
  • 100g dark chocolate chips
  • 50g soft unsalted butter
For the filling
  • 500g cream cheese, softened
  • 3 medium eggs
  • 3 medium egg yolks
  • 200g caster sugar
  • 125mL sour cream
  • 250g smooth or crunchy peanut butter
For the topping 
  • 150mL sour cream
  • 50g milk chocolate chips
  • 30g soft light brown sugar
  1. Preheat the oven to 170 degrees celcius and grease and line (only line the bottom) a 20cm springform tin.
  2.  Place the ingredients for the base into a food processor and process until fine and mixture starts to clump together.
  3. Line the bottom and sides of the pan with the mixture, pressing down with the back of a spoon to ensure a smooth surface. Chill in the fridge while you make the filling.
  4. Wipe the inside of the food processor until clean and fill with the ingredients for the filling.
  5. Process on medium speed for thirty seconds or so, until the mixture is smooth, thick and glossy. If you have lumps in the mixture from the cream cheese, process for a few more seconds. This will get rid of some extra lumps, but any small remainders won't hurt the cake.
  6. Use a rubber spatula to pour the mixture into the prepared tin.
  7. Cook for approximately fifty minutes, or until the top of the cake is set and dry to the touch (the middle will still be a little wobbly).
  8. Take the cake out of the oven (leave it on) and prepare the topping by melting the brown sugar, chocolate and sour cream on a saucepan over a low heat. Stir constantly until melted and combined.
  9. Allow to cool for about a minute, before gently spooning topping over the cheesecake. 
  10. Put cake back into the oven for ten minutes. 
  11. Remove the cheesecake from the oven, allow it it cool completely in its tin.
  12. Cover with plastic wrap (I then put the tin into a plastic bag to ensure it was well covered) and leave in the fridge to set overnight.
  13. When the cake is to be served, remove it from the fridge (only for a few minutes; you don't want it to start melting) and cut with a sharp knife. Smaller slices are advised as it's quite rich!

Friday, September 14, 2012

Red Velvet Cupcakes


I actually don't really know what to say about this recipe. It's cupcakes. They're red. And velvety.
I've made this recipe several times now, including a few times last year, before I got adventurous with my baking. Come to think of it, this recipe actually says a lot about the way my baking has....evolved(?). The first time I attempted these, they came out absolutely terrible. They refused to bake properly and were sticky and mushy. This was due to the fact I didn't have baking soda at home, and thinking it would be okay, substituted it with baking powder; it wasn't.
The next time I tried them, I again forgot that I would need baking soda. Instead, I did some reading on the internet and decided to try substituting it with baking powder, and also switching the buttermilk to normal milk; this worked wonderfully.
Granted, the last batch I made wasn't my favourite (I ran out of caster sugar so it was a liiitle under in terms of flavour), but the fact this is now something I can make easily, to me, is something I can compare to the first time I made these and be proud.
My favourite part of these is the frosting, cream cheese is absolute boss. The cake is also moist but not heavy on sweetness or a strong flavour, so the pair work really well together. Below, I've included the original recipe (no baking powder/soda switchover). I've been told by some of my friends that they prefer these to the ones you can buy at popular cupcake stores; if that's not inflation for my baking ego, I don't know what is.

Red Velvet Cupcakes (Adapted from taste)

For the cupcakes:
  • 300g (2 cups) plain flour
  • 30g (1/4 cup) cocoa powder
  • 1 tsp baking soda
  • 315g (1 1/2 cups) caster sugar
  • 250ml (1 cup) buttermilk
  • 200g unsalted butter, melted
  • 2 eggs, lightly whisked
  • 1 tbs white vinegar
  • 1 tsp vanilla extract
  • 2 tbs liquid red food colouring
 For the frosting:
  • 250g pkt cream cheese, at room temperature
  • 300g (approx 2 cups) icing sugar
  • 60g butter, at room temperature
  • 2 tsp vanilla essence
  1. Preheat the oven to 170 degrees and line two 12 hole muffin trays with patty cases.
  2. Sift the flour, cocoa powder and baking soda into a large bowl. Whisk in the sugar.
  3. In a smaller bowl, whisk the buttermilk, butter, eggs, vanilla and vinegar until combined.
  4. Make a well in the centre of the flour mixture and pour in the wet mixture, stirring to combine.
  5. Stir in the food colouring, making sure the batter is a deep, rich red. Use more than the specified amount if required.
  6. Bake cupcakes in the oven for 20-25 minutes, or until a skewer inserted into the centre of the cupcakes comes out clean.
  7. Allow to cool in muffin pan for five minutes, before transferring to a wire rack to cool completely.
  8. When cupcakes are completely cool, prepare the frosting; place the cream cheese, butter, icing sugar and vanilla into a bowl, beating with an electic mixer until light and fluffy.
  9. Pipe or spread onto cupcakes.
 

Sunday, September 2, 2012

Sugar Cookies

Last Valentine's Day, I thought I'd try my hand at some sugar cookies. Armed with a seemingly easy recipe from rasperri cupcakes (all it contained was butter, flour and sugar!), this ended up taking me a ridiculous amount of time, with my only solace coming from my mother, whose experience with various amounts of dough (because making roti every morning is the same as working with cookie dough, right?) allowed her to help me combat the sticky butter-laden dough. The cookies came out okay in the end, but the recipe was resigned to the deep-dark graveyard of recipes to never again be revisited.
While trawling through Joy of Baking one day, I came across a new sugar cookie recipe, which despite requiring more ingredients than the previous one, seemed much more reliable. I've used this recipe a few times now, and the results are always amazing. The cookies are light and crispy and the dough yields heaaaps of cookies (I'm talking 80+ using a regular sized cookie cutter). I never make the cookies all in one batch, I generally use half - two thirds of the dough in one go, and refrigerate the rest to use a few days later. If you don't need that large of a batch I suggest halving the recipe when making it so as not to waste much. 
As for the topping, I find just dusting them with icing sugar works well, but I experiemented with some royal icing on the second batch and this was also quite excellent... even if I do say so myself. Which I do.

Sugar Cookies (Adapted from Joy of Baking)
  • 3 cups plain flour
  • 1/2 tsp salt
  • 1 tsp baking soda
  • 1 cup unsalted butter, at room temperature
  • 1 cup caster sugar
  • 2 large eggs
  • 3 tsp vanilla essence
  1. In a medium bowl, whisk together the flour, salt and baking soda and set aside.
  2. In a large bowl, cream the butter and sugar together until light and fluffy (approx. 2-4 minutes).
  3. Add the eggs and vanilla essence, beating to combine.
  4. Add in the flour mixture and beat mixture on low speed until mixture begins to combine.
  5. Turn out contents of bowl onto the counter-top and knead until a soft, pliable dough is formed.
  6.  Divide the dough in half, covering each half in cling wrap before placing in the fridge.
  7. After chilling for at least an hour (can be left for a few days if you don't wish to bake the cookies on the same day), roll dough out onto a lightly floured surface into a thickness of approx.1cm (I usually do mine a little thinner as this produces a crispier cookie).
  8.  Use a cookie cutter to press dough into shapes, placing cut-out cookies on a greased and lined baking tray as you go.
  9. Place baking tray in the fridge for ten minutes (this prevents the cookies from losing their shape while baking) and preheat oven to 180 degrees.
  10. Bake the cookies for 8-10 minutes (be mindful of the thinner cookies as they will brown easily).
  11. Allow cookies to cool on baking trays for five minutes before moving onto wire racks to cool completely
** If desired, dust the cookies with icing sugar once out of the oven. Royal icing can be added once the cookies are completely cool.

Tuesday, August 28, 2012

Red Velvet Layer Cake with Cream Cheese Frosting


Last week saw one of Mounty County's finest transition into adulthood. One of my old Maccas buddies, Rachel, turned 18 and for once the choice of cake was very clear. An avid fan of red velvet cake, I knew four layers of reddy-brown moistness sandwiched with cream cheese frosting was the only way to go. 
I have previously stuck to one red velvet cupcake recipe (which I will blog about later), but decided to look up a new one for the purpose of this cake. The method wasn't too difficult and the cake was delicious; moist but not too sweet, perfect for countering the sweetness of the cream cheese icing. As with any layer cake I make, this took quite a while due to the fact I own several different cake pans, no two of which are the same diameter. Therefore each layer had to be cooked one at a time. However this time, I was baking some sugar cookies for my sister to take to school (recipe to come later), so I figured out an efficient rotation system between cookies and cakes which limited time wasted from the oven being on between batches. (Cool story, I know).

The only thing I was slightly disappointed about was the icing in between the layers. Despite knowing the cake wasn't very sweet, I didn't want the frosting to become too overpowering so I was rather sparing with it. This resulted in it soaking up into the layers and made the cake look like one big layer instead of four distinct ones separated by the frosting as I had hoped. Nevertheless, the taste remained unaffected and I was still very happy with the result. Oh, and as you may have noticed from the picture, the cake didn't look as pretty as I had hoped. The sides were rather difficult to ice and after a car trip covered in uneven glad wrap, that was what was left. Still, it's not like I was baking for the CWA, everyone knows taste > everything, right?

Red Velvet Layer Cake (Adapted from Best Recipes)
For the cake:
  • 2 1/2 plain flour, sifted
  • 1 tsp baking powder
  • 1 tsp salt
  • 1/2 cup cocoa powder
  • 120g soft unsalted butter
  • 1 1/2 cups caster sugar
  • 2 eggs
  • 3 tsp vanilla essence
  • 1 cup buttermilk
  • 1 tsp baking soda
  • 1 tsp white vinegar
  • Few tbsp red food colouring 
For the frosting: 
  • 250g cream cheese, softened
  • 60g unsalted butter, softened
  • 2 tsp vanilla essence
  • 2 cups icing sugar, sifted
  1. Preheat oven to 180 degrees and grease and line one round 20cm baking tin (or as many as you have).
  2. Sift together the flour, salt, baking powder and cocoa and set aside.
  3.  In a large bowl, beat the butter, sugar and vanilla with an electric mixer until light and fluffy (approx 3-5 minutes).
  4. Beat in the eggs one at a time, beating well after each addition.
  5. Add in a third of the flour mixture and beat well to combine.
  6. Add in half of the buttermilk and beat again to combine,
  7. Repeat, alternating between the flour mixture and the buttermilk, ending with the flour mixture. Beat well after each addition.
  8. In a small bowl, mix together the vinegar and baking soda until foaming. Add into the batter and mix well with a rubber spatula or large spoon.
  9. Add in the food colouring, a few drops at a time, until mixture achieves a desired shade of red.
  10. Divide cake mixture evenly into four bowls, with the mixture of one going into the baking pan and into the oven. Cover the other three portions with cling wrap and put aside.
  11. Bake each layer for 10-15 minutes, or until a skewer inserted into the centre of the cake comes out clean.
  12. When layers are cooked, let cool in tin for five minutes before transferring to a rack for further cooling. Reline/regrease tray and repeat with each remaining portion of batter.
  13. When all layers are completely cool, prepare the frosting by beating together the butter, vanilla and cream cheese together until light and fluffy (approx 2-4 minutes). Add the icing sugar and beat until mixture is light and creamy.
  14. Sandwich each layer together with icing as well as covering the entire cake in it. Add extra decorations to the cake if desired (I used coloured sugar).